Settings
Enable optional features such as save for later and Google Analytics and configure how you receive information when users submit their forms.
Contents
- Changing your form's name and URL(same page)
- Setting up Google Analytics(same page)
- Enabling users to save their progress on a form(same page)
- Collecting information by email(same page)
- Collecting information in MS Lists(same page)
- Sending users a confirmation email(same page)
- Providing users with reference numbers(same page)
- Taking payments through GOV.UK Pay(same page)
- Transferring your form to another user(same page)
Changing your form's name and URL
You can review and update both your form's name and URL in settings. Go to: Settings > Form name and URL
You can change your form's name at any time but you can only change the URL up until you have published your form to Live. After this point, the option is no longer available in settings. This is because changing a Live form's URL can cause problems for users if they have bookmarked the old form or are using an old link. If you need to change a Live form's URL, contact us to discuss it.
You will need to publish your form for any changes to take effect. If you change the URL of a form that has already been published to Test, any links to the old URL will stop working after you publish the new URL.
Things to consider when changing the name
The new name should continue to follow the guidelines for naming your form.
You can change your name independently of the URL but it's best to ensure your name and URL are closely aligned.
You should also ensure that the title of your start page is aligned with the new name.
Things to consider when changing the URL
Your form is given a URL when you first create it, based on your form name. All forms sit on the same domain and you are only able to change the first part of the URL (the subdomain). For example, the subdomain in this URL is 'contact-us':
https://contact-us.form.service.justice.gov.uk
The subdomain selected by MoJ Forms may be shortened and simplified because of URL restrictions. It must:
- be a maximum of 57 characters
- include only lower case letters
- not include spaces or special characters except hyphens
- not start with a number
In addition to these restrictions, your URL should be easy to read and closely resemble your form's name and start page title. Words should be separated with hyphens. It's OK to cut small words like articles and conjunctions if you are short of space and the meaning is still clear.
Setting up Google Analytics
MoJ Forms allows you to link your form with a Google Analytics account and monitor your form’s performance.
You will need:
- a Google Analytics account - if you don’t have one already, talk to Technology Services Business Relationship Management about raising a service request
- your analytics tracking ID - see ‘Configuring Google Analytics’
You can enable analytics on your Test and Live sites independently and add different tracking IDs. This allows you to test your analytics first and prevent test activity from being recorded in your live data.
To comply with data protection regulations, users are given the option of accepting or rejecting analytics cookies when they first visit your site. This means you will only receive data for the users that actively opt-in to analytics.
Configuring Google Analytics
Go to: Settings > Google Analytics
On this page, you can enable Google Analytics on the Test site and on the Live site. You need to enable and configure the settings for both sites separately.
To enable Google Analytics on a site, check the 'Enable analytics' box. The ‘configure’ settings will then expand to show space for 3 types of tracking IDs. The tracking ID is what links your form to your Google Analytics account. You must enter at least 1 tracking ID and can potentially enter all 3.
MoJ Forms supports 2 types of tracking ID:
- Google Analytics 4 Measurement ID - for Google’s latest analytics service, which we recommend for all new forms. This starts with G, for example: G-0000004.
- Google Tag Manager Container ID - for Google Tag Manager, which is an alternative way of adding analytics code to a form. This starts with GTM, for example: GTM-000003.
How to find your Google Analytics 4 ID
How to find your Google Tag Manager ID
You will need to publish your form for the changes to take effect.
About cookies
To comply with data protection regulations, all our forms include a default cookies statement in the footer section, along with accessibility and privacy.
If you are using Google Analytics 4, this should be sufficient to cover your use of cookies and will not require any additional work.
The cookies page cannot be edited. If you plan to use Google Tag Manager for any marketing or analytics tools other than Google Analytics 4, contact us to discuss it.
Enabling users to save their progress on a form
If you think users might not be able to complete your form in one sitting, you can enable 'save for later'. This feature lets users save their progress on a form and return to complete it another time.
Save for later is a good option for forms that:
- are long or complex
- include questions that users might want time to think about
- ask for information that users might not have immediately to hand
When you save a form, it ends the current session. For this reason, it is not a good option for users who may want the reassurance of saving their progress while continuing on a form. These users may find it helpful to know how the session works instead.
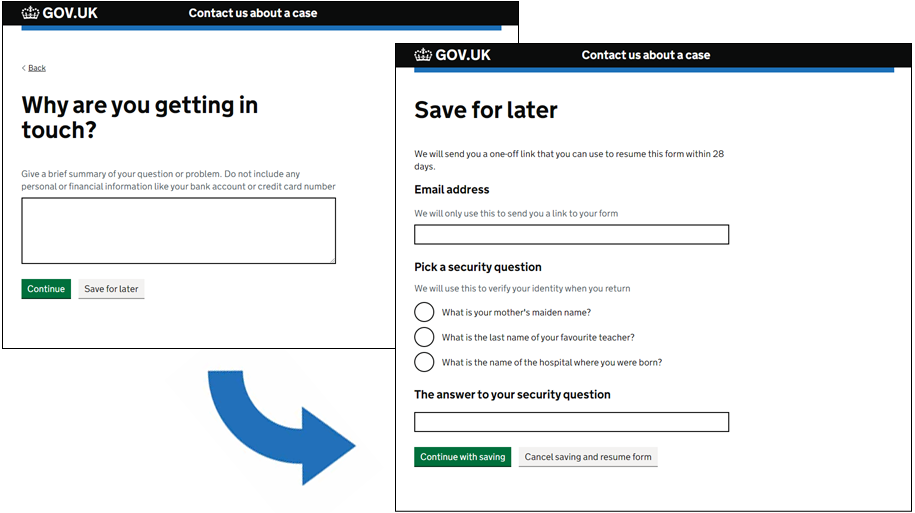
How save for later works:
- You switch on save for later in your form's settings and publish your form for the change to take effect.
- This adds a secondary save button to the bottom of every question page of your form.
- When a user saves their progress, they are asked to enter an email address and a security answer.
- We then email the user a one-off link that they can use to come back to the form and continue.
- The user needs to enter the security answer to retrieve their saved answers. They have 3 attempts to get it right.
- The link is valid for 28 days and will work only once. There is no recovery option if the user loses the link or forgets their security answer.
- Users can save their progress on a form as many times as they like by generating a new link each time.
All user data is encrypted, stored securely and deleted after 28 days.
To enable save and return, go to: Settings > Save for later
Check 'Enable save for later', save and publish your form for the setting to take effect.
Collecting information by email
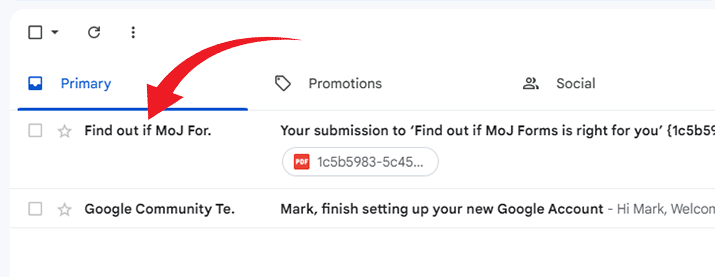
When a user completes your form, you can have their form submission emailed to you.
The email address you use must be an approved MoJ address. This is to help protect user data and ensure it isn't unknowingly sent outside of the organisation.
The answers will be shown in the body of the email and attached to the emails in PDF. They can also be attached in comma separated values (CSV) format. CSV files list the answers in plain text, separated by commas. They can be imported into spreadsheets and other applications, making it easier to handle and process the information you receive. For example, you could import data from multiple CSV files into Microsoft Excel at once.
All data received from a form is labelled OFFICIAL-SENSITIVE. This is to comply with the Government Security Classifications Policy. (Find out more about security classifications for your form.)
You will need to monitor and manage the volume of incoming emails carefully, especially if your form captures a large volume of attachments. Email submissions may be lost if an email inbox reaches its size limit.
Setting up the emails
Go to: Settings > Submission settings > Collect information by email
On this page, you can enable collecting information by email on the Test site and on the Live site. You need to enable and configure the settings for both sites separately. The answers are attached in a PDF and can be additionally attached in a CSV.
To enable the setting on a site, check the 'Enable email' box. The 'configure' settings will then expand and allow you to enter the email address you want the emails sent to. This address should be:
- an MoJ email address, such as @justice.gov.uk or @digital.justice.gov.uk, or other approved address - if the address you want to use isn't accepted, contact us to discuss your requirements
- a team email account with several authorised users to ensure you can maintain your service in the event of team changes or absences
Currently you can send the form to only one address.
There are a number of other email configuration options:
- Subject - the subject line of the email
- Message - the body text of the email
- PDF heading - in the attachment containing user answers (see a sample PDF)
- PDF subheading - in the attachment containing user answers (see a sample PDF)
- CSV attachment - opt to receive an additional email with user answers in CSV format (see a sample CSV)
Collecting information in MS Lists
You can configure your form to send user submissions to a Teams site in Microsoft 365. The answers are collected in Microsoft Lists and any attachments are saved in their own folder.
About MS Lists
MS Lists is an app that helps you track information and organise work. The basic view looks like a table with columns for your form's questions and a row for each submission. You can create rules and automatic tasks, track actions, give access to colleagues and connect to other apps for more powerful automation.
The Technology Adoption Group runs occasional Bitesized learning sessions on MS Lists. Find out more on the How do I? learning site.
Setting up a Teams site
To use this feature, you will need a Teams site in the main "Ministry of Justice" Microsoft tenant. The tenant is shown on your profile whenever you are signed into MS 365. Most MoJ agencies are in the Ministry of Justice tenant but there are a few exceptions, including CICA.
A Teams site is a type of SharePoint site. When you create a Microsoft Team in the Teams app, this usually creates a Teams site at the same time. You can find the site by going to the SharePoint app and searching for the name of your MS Team.
If you don't have an MS Team, you can quickly set one up using the Teams Creator. It can take up to 30 minutes for your Teams site to show in SharePoint search results. Find out more about getting started with Teams.
How to enable collecting information in MS Lists
Go to: Settings > Submission settings > Collect information in Microsoft Lists
On this page, you can enable collecting information in MS Lists on the Test site and on the Live site. You need to enable and configure the setting for both sites separately.
To enable the setting on a site, check the 'Enable MS Lists' box. The 'configure' settings will then expand and ask for a Teams site ID.
To find your Teams site ID:
- open your site in the SharePoint app
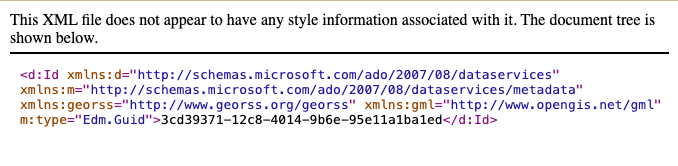
- add "/_api/site/id" to the end of the site URL and enter - for example, https://justiceuk.sharepoint.com/sites/MOJFormscontentsupport/_api/site/id
- in the text that appears, search for "guid"
- the Teams site ID is the long string of letters and numbers that comes after - for example, in the screenshot below, the Teams site ID is 3cd39371-12c8-4014-9b6e-95e11a1ba1ed
We recommend you also enable collecting information by email. This ensures you have a backup of submissions in case there is any disruption to the Microsoft Lists connection.
How it works
When you save the settings page, MoJ Forms will connect with your Teams site and create:
- a list with columns for every question in your form - which will be added to "site contents"
- a folder for attachments (even if your form doesn't have a file upload question) - which will be added to "documents"
The list and folder names will be shown on the settings page. You can rename the files in Teams without breaking the connection, although the new names won't show in the settings page.
The columns will be arranged in the order in which the corresponding questions were created in your form.
Submissions won't start appearing in your list until you publish your form.
Every submission from your form will:
- create a new row in your list with all of the user's answers plus a submission ID unique to that submission
- if there are attachments, create a folder in the attachments folder using the submission ID as the folder name
When a user submits a file, the file name will show in the list and link directly to that file.
Managing your list
Once your list has been created, you can make changes and enhancements without breaking submissions providing you don't delete the generated columns. For example, you could:
- rename column headers and reorder columns
- add columns to help manage submissions, such as status or owner indicators
- add automation using apps such as Microsoft Power Automate
However, whenever you publish an update to your form, MoJ Forms will create a new list and attachments folder. This is to ensure that the list always fully reflects the live version of the form. You will need to reapply any custom elements to the list and remember to update any automation that you are running.
MoJ Forms may also need to update the MS Lists functionality from time-to-time, requiring a new list. We will contact you well in advance of any such changes to minimise the impact on your service.
Sending users a confirmation email
You can configure your form to send users a confirmation email when they submit their answers. The message can be customised to your service and the user's answers will be inserted into the email.
A confirmation email can be used to:
- reassure users that their information was submitted successfully
- allow users to double-check the information they provided and keep it for reference
- help you repeat and reinforce important messages from the confirmation page, such as response times and contact details
The email will be sent by a generic MoJ Forms email address but show as coming from your form name.
You will need to set an email address for users to reply to - even if you don't want users to reply. Users may reply anyway and could include personal information. For data protection purposes, these emails should only go to your team.
The reply address should be:
- a username that is easily associated with your form
- an MoJ email address, such as @justice.gov.uk or @digital.justice.gov.uk, or other approved address - if the address you want to use isn't accepted, contact us to discuss your requirements
- a team email account with several authorised users to ensure you can maintain your service in the event of team changes or absences
To deter replies, you could:
- include appropriate contact details in the confirmation email
- create a separate email address for replies and set an auto-reply message with meaningful information
Setting up the confirmation email
To enable this feature, you will need to capture your users' email addresses using an email address question. You will need at least one question of this type before you can set up the confirmation email.
Once you have an email address question in your form, go to: Settings > Submission settings > Send a confirmation email
On this page, you can enable a confirmation email on the Test site and on the Live site. You need to enable and configure the settings for both sites separately.
To enable it on a site, check the 'Enable confirmation email' box. The 'configure' panel will then expand to show the following settings:
- Reply to - the email address that replies will go to
- To the email address captured by - the question in your form that asks the user for their email address (if there is more than one email address question in your form, you will be able to select between them)
- Subject - the subject line of the email
- Message - the body text of the email
The user's answers will be inserted into the email beneath the message. (You won't see this in the settings page.) The message does not currently support any rich text formatting such as headings or bullet points.
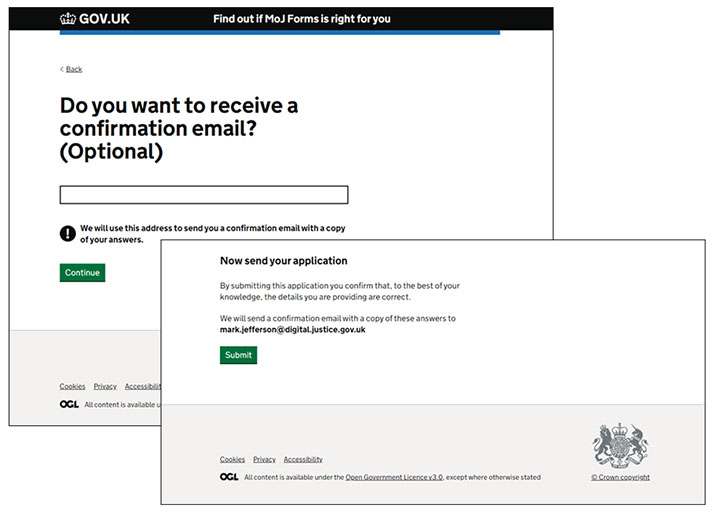
When you enable confirmation email, MoJ Forms automatically adds disclaimers to your form to let users know how their email address will be used. These disclaimers appear:
- directly beneath the question used to capture the user's email address
- on the check answers page, before the submit button
These messages are not currently editable. If you plan on using the email address for other purposes, you should mention this in the question's hint text.
Providing users with reference numbers
MoJ Forms can generate unique reference numbers for each submission made by your form. This can make it easier to keep track of the submissions you receive and discuss them with users should the need arise.
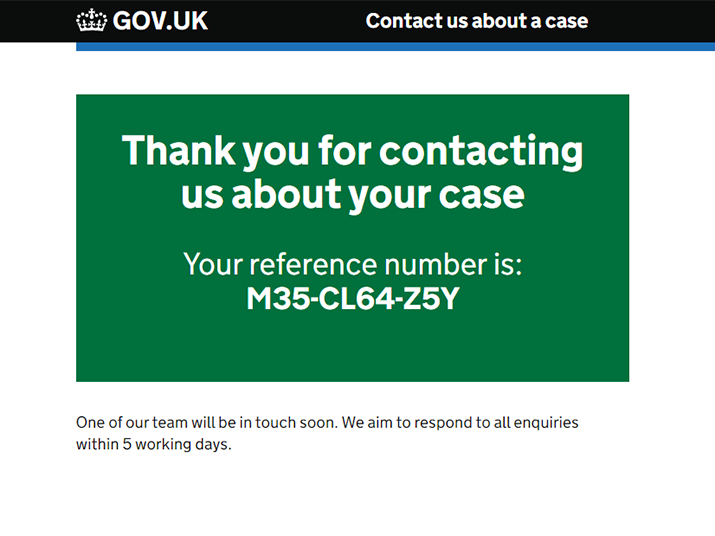
For each submission, a unique reference number is generated and inserted into:
- the confirmation page
- the subject and message of the submission email
- the PDF and CSV attachments of user answers
- the subject and message of the confirmation email
(You will need to enable the emails separately.)
MoJ Forms reference numbers are a mixture of 10 letters and numbers such as A12‑B345‑C67.
Setting up reference numbers
Go to the settings page (Settings > Reference numbers and GOV.UK Pay) and check "Enable reference numbers".
This will insert a placeholder for the reference number into your confirmation page, submission email and confirmation email templates (for both Test and Live sites).
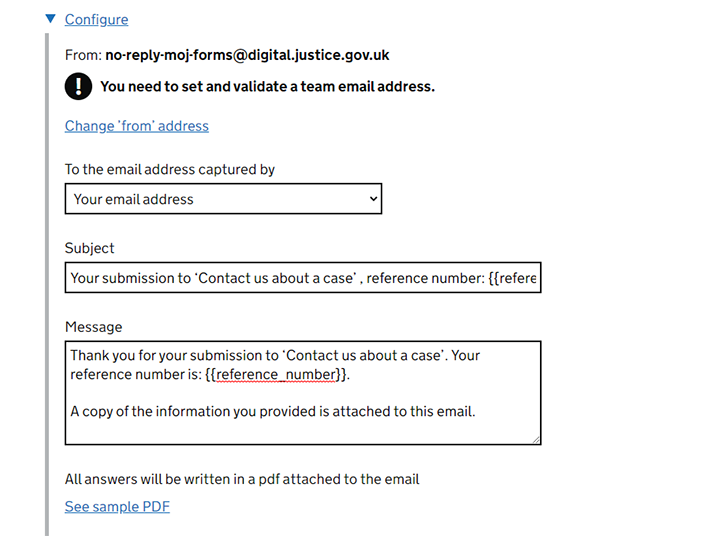
You can edit the email content and use the placeholder {{reference_number}} wherever you want the reference number to appear.
When you enable or disable reference numbers it will overwrite any custom text in your email templates and reset them to default text. You may therefore want to take a copy of your emails before changing this setting.
Taking payments through GOV.UK Pay
If you have a GOV.UK Pay account and are set up to take payments through a payment link, MoJ Forms can help you join up form submissions with payments.
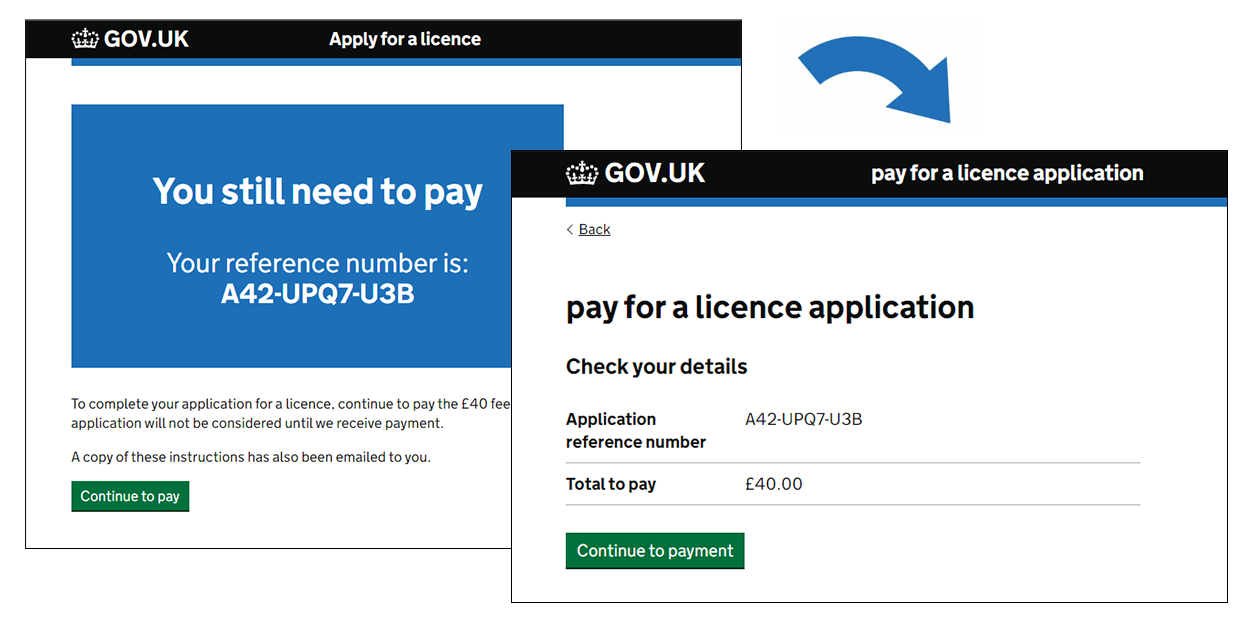
How it works:
- In GOV.UK Pay, you create a payment link.
- In your form, you enable GOV.UK Pay payment links and reference numbers and enter your payment link URL.
- MoJ Forms then combines your payment link with the reference number and inserts the new link into the confirmation page and confirmation email. (You will need to enable the confirmation email settings separately.)
- After a user completes your form, they use the payment link to visit GOV.UK Pay to make a payment. This automatically applies the MoJ Forms reference number to the payment.
- You can then use the reference number to match a payment with the corresponding form submission.
Setting up GOV.UK Pay
Before you can take payments in this way you will need to:
- set up a GOV.UK Pay account
- talk to your local finance team to set up a payment service provider
You can create a GOV.UK Pay account and set up a test payment link in just a few minutes but it may be several months before you are ready to take payments. This depends on the payment service provider arrangements in your area. For example, MoJ, HMCTS and HMPPS all have separate agreements with the Government Banking Service.
Setting up GOV.UK Pay payment links
Go to the settings page (Settings > Reference numbers and GOV.UK Pay) and check both settings:
- Enable reference numbers
- Add payment links with reference numbers
Then enter your GOV.UK Pay payment link URL into the field provided. You get this from your GOV.UK Pay account and it should start with "https://gov.uk". When setting this up, ensure you select 'yes' when asked if your users already have a payment reference. This is the field that will be pre-filled for your users with the MoJ Forms reference number.
This will then insert placeholders for the payment link into your confirmation page and confirmation email templates (for both Test and Live sites). It will also insert separate placeholders for the reference number in several places. (See Providing users with reference numbers.)
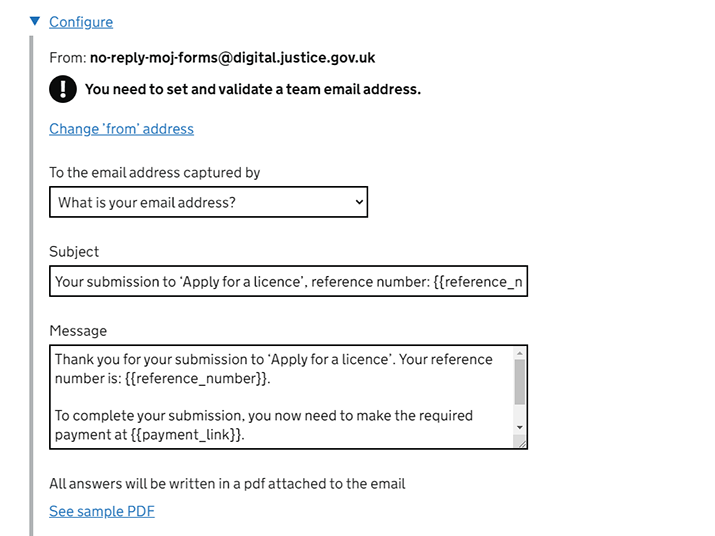
You can edit the email content and use the placeholder {{payment_link}} wherever you want the payment link to appear.
When you enable or disable payment links it will overwrite any custom text in your email templates and reset them to default text. You may therefore want to take a copy of your emails before changing this setting.
Transferring your form to another user
You can transfer your form to another MoJ Forms user by changing your form's 'owner' in settings.
A form can have only one owner at a time. Only the owner can see the form on the 'Your forms' page and open the form in the MoJ Forms editor.
Transferring a form
Go to: Settings > Change form owner
Enter the email address of the person you want to transfer the form to. They must already be an MoJ Forms user and have signed into MoJ Forms at least once.
If they aren't a user yet, ask them to contact us to get access.
Once you change the form's owner, you will be taken back to 'Your forms' and no longer see or be able to access the form.
The new form owner will be notified by email of the change.