Branching and flow management
Use advanced features to create and manage more complex forms.
Contents
- What is branching?(same page)
- Adding branching(same page)
- Editing branching(same page)
- Deleting branching(same page)
- What are unconnected pages?(same page)
- Reconnecting unconnected pages(same page)
- Changing the order of pages(same page)
What is branching?
Branching is what we call the ability to show users different pages based on their previous answers. You can create multiple routes - branches - through your form so that the people filling it in see only the questions or content that are relevant to them. With branching, a form can be quicker and easier to fill in and the answers given can be more relevant to your needs.
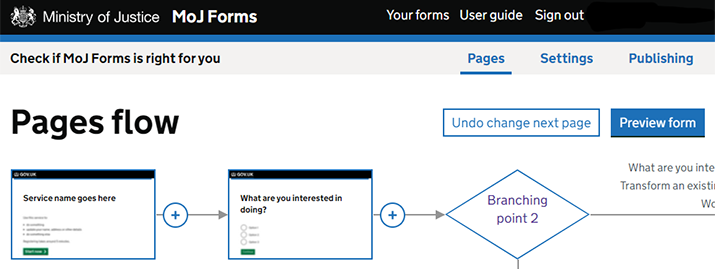
With MoJ Forms, branching can be set up in minutes without any specialist knowledge of coding or logic. The branches are clearly shown in the form flow view.
Branching requires 2 things:
- a radio button or checkbox question to base the branching on - these are the only question types that currently support branching
- a destination page for each of the branches you want to create
Branching requires that you create separate pages. If you only want to change a small amount of content on a page, it might be easier to do this using the content visibility setting.
Adding branching
To add branching, open the connection menu (+) at the point where you want your form to branch and select 'Add branching'. This will create a 'branching point' - a page where you configure the rules for your branches.
Before you add branching, consider 2 things:
- What questions are you basing your branching on? Your form should contain at least one radio button or checkbox question for this. You can use a single question or combine multiple questions to create as many branches as you need.
- What pages will your branches lead to? You can create these pages first or point all your branches to the same page (for example, the check answers page) and add extra pages later. If you intend any of your branches to end in an exit page - for example, to disqualify certain users from progressing through the form - it's easier to do this after setting up the branching point.
Don't worry if you haven't worked out all the details of your branches up front. It's easy to change and expand your branches as you go.
Configuring the branching point
A branching point contains 2 blank branches by default - 'branch 1' and 'otherwise'. You can add as many branches as you need using the 'add another branch' option.
Forms apply branching rules from top to bottom. A user will be routed along the first branch they meet the conditions for, even if they also meet the conditions of other branches. You can't change the order of branches so you may need to play around with your settings to get them right.
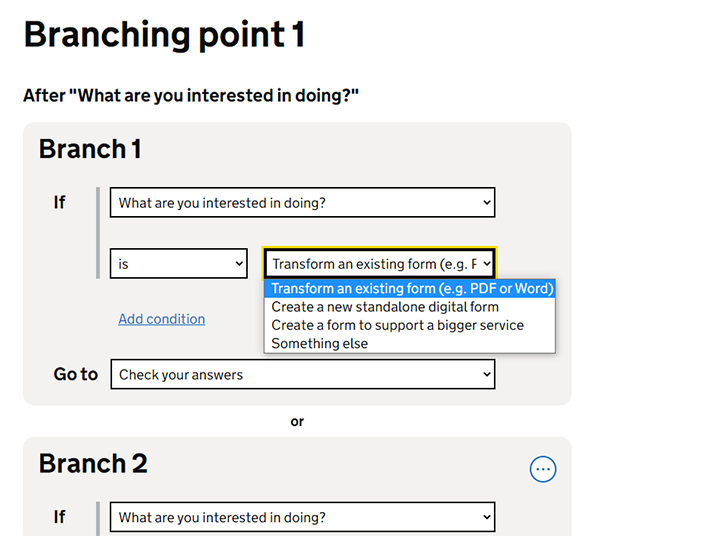
Each branch form (indicated by branch 1, branch 2 and so on) allows you to specify the rules of a branch. These consist of:
- If - the condition that must be met for a user to be routed along the branch
- Go to - the page that the branch will lead to
There are several elements to a condition. The options will vary depending on whether you are using a radio button or checkbox question but they generally include:
- the question
- an operator - such as 'is' or 'is not'
- the user's answer
The options for operator and answer will only appear after you have selected a question.
For example, a condition could be if the answer to a question about your favourite colour is red or is not blue or contains orange.
A branch can have as many conditions as you need but all must be met for the user to be routed along the branch.
The 'otherwise' branch
The 'otherwise' branch is a final branch to capture any users that don't meet the conditions of your other branches. It is set to the next page in the flow when the branching point is first created but can be changed to another page.
This final branch can't be deleted so it's helpful to consider it when planning your form. For example, if you know that there are only 2 possible routes for your users (such as with a 'yes' or 'no' question), you only need to define a branch for one of those routes and allow other users to route along the 'otherwise' branch.
Adjusting the flow view
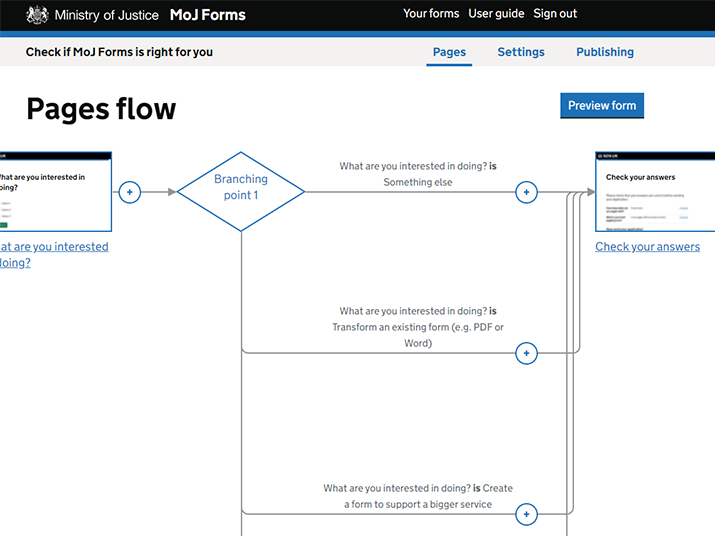
After saving your branching point, your new branches will be reflected in the flow view. Your pages will be rearranged and new arrows drawn to indicate the paths a user could take when completing your form. You may need to make some adjustments at this point for a few reasons:
- If you chose to point all of your branches to the same page, you can now start adding pages to build out your branches.
- If you created the pages you wanted your branches to lead to first, they will still be linked to each other. This may or may not be correct for your form.
- Any pages that were between the branching point and the 'go to' page of a particular branch when you set up the branching point will become unconnected and be moved to the unconnected pages section (see What are unconnected pages? for details).
These issues can be fixed quickly and easily. See Changing the order of pages for details.
Editing branching
You can open a branching point to edit in 2 ways:
- selecting the branching point directly
- opening the branching point menu (...) and selecting 'Edit branching'
Deleting branching
You can delete individual branches or the entire branching point:
- individual branches can be deleted in the branching point page from the branch menu in the top right corner of each branch
- branching points can be deleted from the form flow view using the branching point menu (...)
When you delete a branching point, you are able to select which branch you want to retain as your main path.
Any pages no longer linked in your form flow after the deletion will be moved to the unconnected pages section.
Deleting a branch or branching point is permanent and cannot be undone.
What are unconnected pages?
Unconnected pages are pages that have no other pages leading to them. When this happens, they become detached from your main form flow and stored in a separate section.
Pages (and branching points) may become unconnected in a number of ways:
- when you create a branch and set the 'go to' page, any pages between the branching point and the 'go to' page may become unconnected
- when you use 'change next page' to change the order of your pages in the flow, any pages that are bypassed by the new flow may become unconnected
- when you add an exit page, any pages that come after the new page may become unconnected
Unconnected pages will be published with the rest of your form but remain invisible to users. They can only be accessed by someone with the specific page URL.
Reconnecting unconnected pages
Unconnected pages can be brought back into your main form in a number of ways.
In most cases, the easiest ways is with 'move page' - this option allows you to move one page at a time to anywhere in the flow. To move an unconected page, open the page menu (...) and select 'Move page'.
A group of unconnected pages can be brought back into your main flow in one go from the point where you'd like to insert them:
- immediately after a branching point - by editing the branching point to set the first page as the 'go to' page
- after another page - by using 'change next page' in the connection menu (+) to set the first page as the next page
The group of unconnected pages will all be moved back into your main form together.
See Changing the order of pages for details.
Changing the order of pages
'Change next page' allows you to change which page comes next in the flow from any point. The 'go to' setting in a branching point has the same effect.
These options allow you to change the order of your pages in the flow by pointing arrows at different pages. They are also how you bring pages back from the unconnected pages section into the main flow.
For example, if you had 5 pages like this:

You could change the next page after page 2 to be page 4, like this:
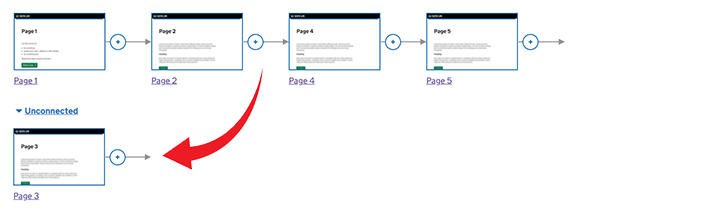
Any pages between the current next page and the new next page - such as page 3, in this example - become unconnected. This means there is no possible path to them anymore and they are moved to a separate unconnected pages section below your main flow.
You can bring unconnected pages back into the flow by changing the next page of one of the pages in the flow. For example, you could change the next page after page 4 to be page 3, like this:

Unconnected pages 'remember' their next page so when you bring them back into your form flow other pages may be moved as a result. In this example, page 3 still leads to page 4, which has caused a loop. Page 5 has become unconnected. To fix it, simply change page 3's next page, like this:

If the unconnected page you select is connected to other pages, these will also be brought back into the main flow in the same order.
Editing the 'go to' setting in the branching point works in the same way and points the branch's first arrow at your selected page.
Undoing change next page
When you use change next page, an 'Undo' button will appear alongside the preview button. Selecting undo will reverse the change.
If you undo the change, a redo button will appear allowing you to repeat the original action.
If you perform any other action on your form, the option to undo or redo the action will no longer be available.